Difference between revisions of "Xing"
From Contao Community Documentation
m (→Details) |
m (→Note to older "TYPOlight" versions) |
||
| Line 39: | Line 39: | ||
( /typolight/install.php in older TYPOlight installations )<br /><br /> | ( /typolight/install.php in older TYPOlight installations )<br /><br /> | ||
| − | ==Note | + | ==Note for older "TYPOlight" versions== |
===TYPOlight 2.8=== | ===TYPOlight 2.8=== | ||
Users of TYPOlight 2.8.x, please use XING module 1.1.1! ([http://www.contao.org/extension-list/view/gl_xing.10010019.en.html Direct Link]) | Users of TYPOlight 2.8.x, please use XING module 1.1.1! ([http://www.contao.org/extension-list/view/gl_xing.10010019.en.html Direct Link]) | ||
Revision as of 14:19, 17 August 2010
| |
Incomplete Article: This article is not finished yet and needs expansion.
Please expand it and remove this notice when it is finished. |
I'm not a native English speaker. Please correct my mistakes.

But I wanted:
- to select the image
- to determine the position
- several of them on one side, or distributed on several domains.
First, categories are created, in these categories then the XING profile(s). With the XING-Lister, you can select the category that are used. Each front-end module can be assigned their own template. Three different templates are included. (see "Using")
Thus, it is then possible, the categories to distribute on several layouts or several domains. Are there more than one profile in a category, all profiles will be shown from this category. Thus it would be e.g. possible to show the profiles of a whole team.
| Extension-Overview | |
|---|---|
| Name of the developer | Glen Langer (BugBuster) |
| Developer Website | http://www.contao.glen-langer.de |
| Version of the extension | 2.0.0 |
| Compatibility with Contao Version | ab 2.9 |
| Compatibility with TYPOlight Version | 2.7.0 - 2.8.4 (see Installations notes) |
| Link to Extension Repository | http://www.contao.org/extension-list/view/gl_xing.html |
| Donate the developer | Cappuccino |
| Link to Tracker | http://dev.typolight-forge.org/projects/xing/issues |
| Comment | Version for Contao 2.9.0 online |
Forum
Questions about the Xing module will be answered in forum:
English: Forum
German: Forum
Errors and requests can be reported in the Issue Tracker.
Installation
The installation of the module occurs about the extension Repository in back end of Contao.
A manual installation is possible. Download the ZIP file from Extension Repository, unzip and transfer it.
A directory should have been created "/system/modules/gl_xing".
Then call /contao/install.php - Perform Update Database.
( /typolight/install.php in older TYPOlight installations )
Note for older "TYPOlight" versions
TYPOlight 2.8
Users of TYPOlight 2.8.x, please use XING module 1.1.1! (Direct Link)
TYPOlight 2.7
Users of TYPOlight 2.8.x, please use XING module 1.0.4! (Direct Link)
Xing Update version 1.x to version 2.x
| |
Caution: Version 2.x is not fully compatible with previous versions, an update is possible. |
What is to be observed, can be found here.
Overview
The Xing module contains a back end and a front end module.
In the back end, there are "Xing", for the front end "Xing list".
Back end

English screenshot follows.
Frontend
For the front end module, a CSS file is included as an example:
- mod_xing_fe.css for a normal, line-by-line output.
Xing Banner
The simplest variant, only the linked image:
![]()
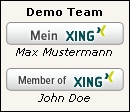
The more complex variant, several Xing banner of a team, with team name and names of team members.

| |
Caution: Translation and screenshots follows. |
Erste Schritte
Als erstes legt man über den Menüpunkt Xing eine neue Besucher Kategorie an. In dieser dann das Xing Profil / die Xing Profile.
Danach legt man ein Frontend Modul an und baut es in das Layout der Seite ein.
Hier nun die einzelnen Schritte, jeweils mit den Default Angaben. Technical details will be explained later.
Anlegen einer Kategorie
Um eine neue Besucher Kategorie zu erstellen, klickt man links im Backend unter 'Inhalte' auf 'Xing'. Im Hauptbereich dann auf den Button 'Neue Kategorie'.
Xing - Neue Kategorie
Dort gibt man der Kategorie einen Namen, auf diesem wird später das Fontend Modul zurückgreifen. Anschließend klickt man auf "Speichern und Schließen".
Nun ist man in der Kategorie Übersicht. Durch Klick auf den Bleistift in der Zeile der Kategorie und nochmaligem Klick auf den Bleistift im Kopf der Kategorie gelangt man wieder zu den Einstellungen der Kategorie.
Anlegen des Profils
In der Kategorie Übersicht klickt man nun auf Edit (Bleistift) der Kategorie.
Dort entweder auf 'Neues Profil' und dann das Pfeil Symbol oder auf das Plus im Kopf der Kategorie:
Xing - neues Profil
Nun sind einige Angaben nötig:
- XING Profil eingeben, z.B.: Max_Mustermann , Erläuterungen dazu in der Hilfe (Help Wizard)
- XING Layout wählen, Erläuterungen dazu in der Hilfe (Help Wizard)
- "Veröffentlicht" aktivieren
anschließend klickt man auf "Speichern und Schließen".
Frontend Modul
Ein neues Frontend Modul wird angelegt über:
- Layout -> Themes -> Frontend Module -> Neues Modul (Contao ab 2.9)
- Layout -> Module -> Neues Modul (TYPOlight bis 2.8.x)
Als erstes unbedingt zuerst den Titel eingeben, erst dann bei Modultyp: 'Xing' - 'Xing Anzeige' auswählen. Es ändern sich nun die Formularfelder.
Bei 'Xing Kategorie' nun die vorher angelegte Kategorie auswählen, anschließend 'Speichern und Schließen'.
Nun muss das angelegte Frontend Modul noch im Layout eingebunden werden:
- Layout -> Themes -> Seitenlayout -> Edit des genutzte Layouts (Contao ab 2.9)
- Layout -> Seitenlayout -> Edit des genutzte Layouts (TYPOlight bis 2.8.x)
Bei 'Eingebundene Module' das gerade erstellte Frontend Modul einbinden (z.b in left)
CSS-Datei
Wie bereits erwähnt, wird für die Darstellung eine CSS-Datei mitgeliefert. Für die ersten Tests sollte die Datei mod_xing_fe.css aus dem Verzeichnis /system/modules/gl_xing kopiert werden nach /tl_files und dann über das Backend importiert und im Layout aktiviert werden.
Technical Details
Feinheiten sind innerhalb der Kategorie sowie im selbst angelegtem Frontend Modul machbar/einstellbar.
Feinheiten innerhalb der Kategorie
Team Profile
In den Einstellungen in der Kategorie selbst gibt es nichts weiter, aber man kann in der Kategorie mehrere Xing-Profile anlegen.
Einsatz wäre z.B. eine Übersicht von allen Team Mitgliedern.
Je nach Template Auswahl im Frontend-Modul wird der Kategorie-Name zum Team-Name.
Sie nächsten Abschnitt wie das Ganze dann aussehen kann.
Feinheiten in der Frontend Modul Definition
Templates
Ist nur ein Xing-Profil in der Kategorie definiert, sind folgende zwei Templates sinnvoll einzusetzen:
- mod_xing_list , es wird nur die verlinkte Grafik gezeigt

- mod_xing_list_profile, es wird die verlinkte Grafik gezeigt, darunter der Profile Name (Unterstrich wird dabei entfernt)

Sind mehrere Xing-Profile in der Kategorie definiert um ein Team darzustellen, sind folgende zwei Templates sinnvoll einzusetzen:
- mod_xing_list_profile, es werden untereinander die verlinkten Grafiken angezeigt, jeweils darunter der Profile Name (Unterstrich wird dabei entfernt)

- mod_xing_list_team, wie bei mod_xing_list_profile, zusätzlich erscheint über der ersten Grafik der Team-Name (Kategorie Name)

Sie können eigene Templates im Ordner /templates bzw. im Template Ordner des verwendetem Themes speichern.
Templates müssen mit mod_xing_list beginnen und die Dateiendung .tpl haben. ( z.B.: mod_xing_list_club66.tpl )
Nur Gästen anzeigen
Nach dem Aktivieren der Funktion wird das Modul versteckt, sobald ein Mitglied (Frontend Nutzer) angemeldet ist.
Modul schützen
Hier kann nun definiert werden, dass die Anzeige des Moduls nur dann erfolgt, wenn Mitglieder bestimmter Gruppen angemeldet sind.