Difference between revisions of "Chat HowTo"
From Contao Community Documentation
(→Configure Chatzilla) |
(→Introduction) |
||
| Line 2: | Line 2: | ||
| + | {{stub}} | ||
=Introduction= | =Introduction= | ||
Revision as of 08:56, 28 May 2010
THIS IS GOING TO BE THE ENGLISH IRC CHAT HOWTO AND IS BEING TRANSLATED STEPWISE. DON'T GET CONFUSED BY GERMAN PARAGRAPHS AND GERMAN SCREENSHOTS. ANY HELP (TEXT AND SCREENSHOTS) IS HIGHLY APPRECIATED!
| |
Incomplete Article: This article is not finished yet and needs expansion.
Please expand it and remove this notice when it is finished. |
Contents
Introduction
To join an IRC network chatroom there are various programs for nearly every operating system. The (inofficial) chatroom for the Content Management System Contao is called #contao and can be found on the Freenode network.
The aim of this chatroom
The chat provides a possibility to get together with other users and exchange opinions/views, ask for help or just chit and chat about this and that. However, it is NOT an alternative to not reading the manuals or not using the search engine on the board !
Firefox with Chatzilla
This Howto limits itself to the Firefox add-on Chatzilla. Firefox is a widely known browser and available for the lion's share of all operating systems. If you are an advanced IRC user and join the channel with another software: Please feel free to add your tutorial and share your knowledge with the world!
Install Chatzilla
Firefox provides a built-in installer for add-ons to enhance itself. Go to https://addons.mozilla.org/en-US/firefox/addon/16/ and click 'Add to Firefox'. After the installation you need to reboot Firefox.
Configure Chatzilla
After the installation and the reboot of Firefox we need to configure some basic settings to connect to the Freenode network and get the chatroom started.
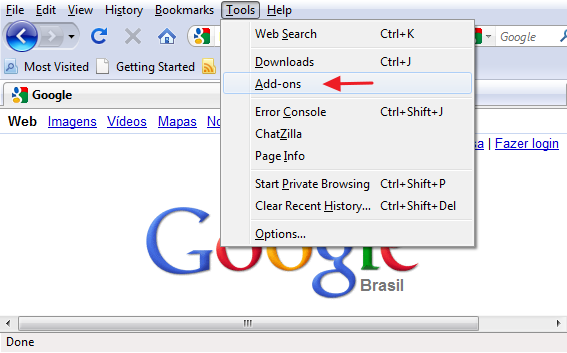
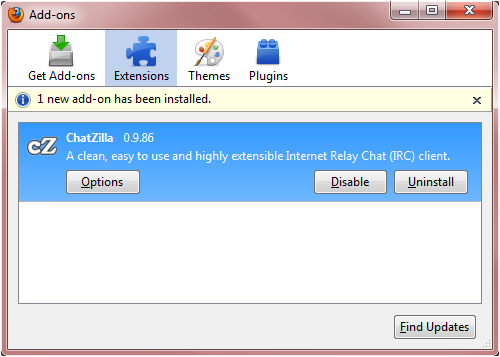
The add-ons can be found in the add-on manager (Navigation bar Tools --> Add-ons).
Choose the plugin 'Chatzilla' within the add-on manager and click on 'settings'.
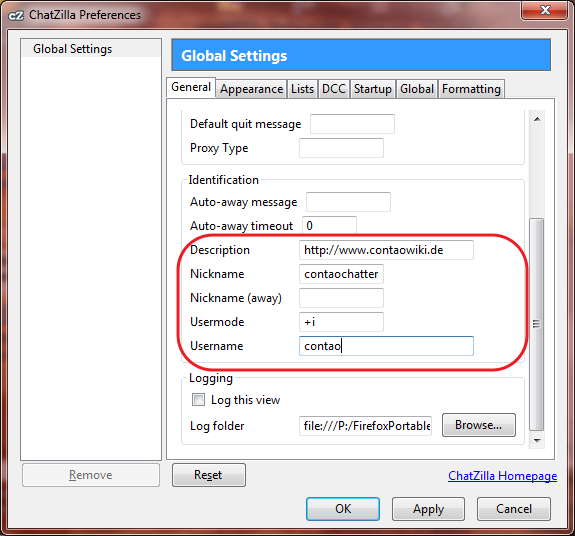
After clicking on the tab 'General' you will find the fields 'Description', 'Nickname' and 'Username'. Add your username to both, the Nickname and Username. Description is optional and up to you what you want to write there. Then confirm all the windows.
Use Chatzilla
Chatzilla wird über die Menüleiste Extras --> Chatzilla gestartet.
Chatzilla hat von Haus aus verschiedene Netzwerke gespeichert. Um mit einem Server des Freenode-Netzwerkes zu verbinden, klickt man entweder mit der Maus auf den Link "Freenode" oder gibt in der Texteingabeleiste folgenden Befehl ein und klickt Enter:
/server irc.freenode.net
Es öffnet sich ein neuer Tab namens "Freenode" und der Verbindungsaufbau beginnt. Der Verbindungsaufbau kann mehrere Sekunden dauern und wird durch ein oranges "Connecting" angezeigt.
Wenn die Verbindung zum Server hergestellt wurde, zeigt Chatzilla dies mit einem grünen "Connecting". Als letzter Schritt muss der Chatraum betreten werden. Um den Raum #contao bzw. #contao.de zu betreten, gibt man folgenden Befehl in die Texteingabeleiste ein und bestätigt mit "Enter":
/join #contao
Das Chatfenster öffnet sich in einem neuen Tab und ist wie folgt eingeteilt.
- Tab für den Raum #contao (bzw. #contao.de)
- Texteingabeleiste: Text eingeben und Enter drücken
- Liste der im Raum befindlichen User
- Chatfenster: Hier werden die geschrieben Texte angezeigt
Bitte Beachten!!
Nur, weil ein Nickname in der Nickliste erscheint, bedeutet das nicht, dass der jeweilige Nutzer gerade verfügbar ist. Es kann sein, dass das User gerade im Hintergrund arbeitet, anderweitig beschäftigt oder gar nicht vor dem PC sitzt. Manche User benutzen auch einen Bot (Eggdrop) oder Bouncer (Bouncer), der online bleibt, wenn der Benutzer den Computer abschaltet.


