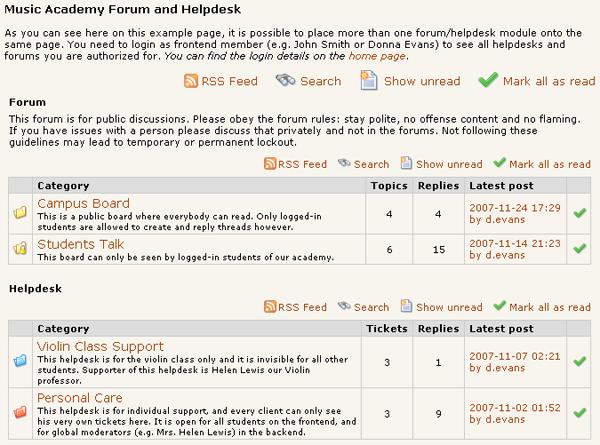
Helpdesk
From Contao Community Documentation
| |
Incomplete Article: This article is not finished yet and needs expansion.
Please expand it and remove this notice when it is finished. |
Contents
- 1 Forum and Helpdesk
- 1.1 Features
- 1.2 Abstract
- 1.3 Categories
- 1.4 Installation and Setup
- 1.5 Custom themes and templates
- 1.5.1 Backend themes
- 1.5.2 Frontend themes
- 1.5.3 Templates
- 1.5.4 "Personal data" Module
- 1.5.5 Enabling RSS Feeds
- 1.5.6 Category Settings
- 1.5.7 Contao settings
- 1.5.8 .htaccess Modification
- 1.5.9 Add RSS icon link to page layout
- 1.5.10 Email Import and Notification
- 1.5.11 Manual upgrade from a previous version
- 1.5.12 Optimizing full text search
- 1.6 Getting started
Forum and Helpdesk
| |
Note: | Parts of this documentation were created by Peter Koch / IBK Software AG. Peter Koch has licensed this content for use on contoawiki.org. Content in this page must not be copied, reproduced, republished, uploaded, posted, transmitted, distributed, or used for the creation of derivative works without IBK's prior written consent. |
Features
 * Native TYPOlight application; fully integrated into TYPOlight user/member system.
 * Can be used as forum, as helpdesk ticketing system, or both at same time.
 * Both, frontend members and backend users, can be members/clients or moderators/supporters.
 * Multiple frontend modules with selected categories are possible; to be displayed on one or several pages, or embedded within articles.
 * Backend modules for configuration and forum participation.
 * Comprehensive and fast BBCode engine including tables, lists, several box types, syntax highlighting and more.
 * Popup windows for BBCode help and editor preview.
 * Email notification to subscribing users.
 * Email import to create new topics/tickets, as well as to reply to notifications.
 * Fully customizable layout and appearence by templates and themes.
 * Powerful search engine.
 * RSS feeds for any selection of categories.
 * Convenient moderator functions including cut/paste operations to move messages and topics
Abstract
TYPOlight Forum/Helpdesk is a message board (forum) application designed to be as well used as a helpdesk ticketing system, for example to provide formal and informal support to customers or clients. The terminology and functions of the forum categories is slightly different than the support ticketing categories, but when you know the mapping you will immediately be familiar with the application:
| Forum | Helpdesk | |
|---|---|---|
| Category types (1) | Restricted or public | Private, shared or public |
| Thread naming (2) | Topics | Tickets |
| Frontend users (3) | Members | Clients |
| Backend users (4) | Moderators | Supporters |
Categories
 Public Forum: Everybody can read the forum, even non-logged in users. Only authorized members can however open topics or reply.
 Restricted Forum: The forum is visible only for authorized members.
 Public Support: Everybody can see all tickets, even non-logged in users. Only authorized clients can however open tickets or reply.
 Shared Support: All authorized clients can see and reply each others tickets, however only the owner has priviledge to close or delete his tickets. Create such a category for example for each company with a SLA((Service level agreement)) where multiple staff members shall have access to the tickets.
 Private Support: Only the ticket owner can see his tickets, but nobody else (admins and supporters authorized for the category can of course also see and reply to the tickets). Used for example for formal support of individuals.
Topic vs. ticket status
Topic status
 Pinned up: Open topic that is listed on the top.
 Normal: A normal open topic.
 Closed: No further edits or replies are possible, listed at the end.
Ticket status
 Unanswered: The ticked is open and the latest post is from a client. Listed on the top.
 Answered: The ticket is open and the latest post is from a supporter.
 Closed: Issue solved. No further edits or replies are possible, the owner may reopen it however in case. Listed at the end.
Members and Clients
Forum members and support clients are either "frontend members" or "backend users" in terms of TYPOlight, and belong to a member/user group authorized for the respective category. The client opening a ticket has special "owner" rights in the support type categories: He has authorization to close or delete (5) his tickets.
Admin, Moderators and Supporters
Moderators and supporters are either TYPOlight backend users or frontend members, and belong to a user group authorized as moderator/supporter for the respective category. They have special rights to see unpublished, to pinup, edit, unpublish or delete any topic, ticket or message.
Contao admins are special backend users and appear as moderator or supporter, he/she is automaticly authorized for all categories. Additionally the admins have authorization to administrative operations, e.g. create or delete categories or change category settings. Also admins are the only ones who can see unpublished categories.
Deletion levels
Tickets and messages are not permanently deleted, but only unpublished from frontend when a ticket owner or member/client "deletes" them. They are still available for moderators and supporters however, mainly to serve as a knowledge resource. Tickets and messages can be permanently deleted only by admins, moderators and supporters.
Installation and Setup
Requirements
- PHP from version 5.2.0
- Other requirements like [[1]]
Manual Installation
- Install these required extensions in advance: extensions:avatar, extensions:cron, [[2]]
- Download the install package from [[3]].
- Unzip the content of TL_ROOT to the TYPOlight base directory on your webserver.
- Unzip the content of TL_FILES to the tl_files directory on your webserver.
- Point your browser to http://www.yourdomain.com/typolight/install.php
- Enter the installation password and click Login
- Scroll down to Update database tables and click on Update database
Site structure settings
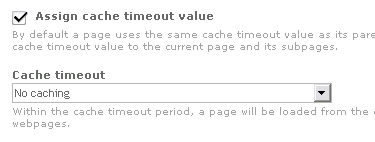
The page where the forum/helpdesk is located should have caching disabled, e.g:
Page layout adjustment
The module will also work without this, however it will look poor in the frontend.
Go to Page layouts and change the layout for the pages that will display the forum/helpdesk. This might be a special layout you make for the forum/helpdesk pages, or the Default layout.
Scroll down to Additional ‹head› tags and append the following lines to whatever might allready be in there:
<link rel="stylesheet"
      href="system/modules/helpdesk/themes/default/frontend.css"
      type="text/css"
      media="screen,projection,print" />
<!--[if lte IE 6]>
  <style type="text/css">
    .pngfix { behavior:url("system/modules/helpdesk/themes/default/pngfix.htc") }
  </style>
<![endif]-->
Custom themes and templates
Backend themes
To create the theme //mysite// you would first of cause create a new TYPOlight backend theme folder /system/themes/mysite and activate it in in the //Settings//.
Then likewise you would create a folder system/modules/helpdesk/themes/mysite, copy the CSS files from the adjaccent //default// folder and make your adjustments to them. Please note that because of the automatic fallback it is //not// necessary to copy all the images from the //default// theme. In case you want your own icons, just create a subfolder //images// and put them in there; any icons not found there will be taken from the //default// theme.
Frontend themes
Copy the CSS files from system/modules/helpdesk/themes/default to your custom frontend theme folder and make the desired adjustments. Don't forget to adjust the //Page layout// as explained before to use your custom stylesheet instead of the default one.
You may want to replace some or all of the default forum/helpdesk icons too. Just put your custom icons into an //images// folder below your custom theme. Then enter the path of your images folder in the helpdesk settings. Again there is a fallback built in, so any icon not found in your custom images folder will be taken from the //default// backend theme.
Instead of PNG you may use GIF icons. In case both, a GIF //and// a PNG icon is found, the PNG has precedence.
Templates
In case you need to customize the default templates, just copy the files of interest from /system/modules/helpdesk/templates to /templates and make your adjustments.
Please note that the template files are used for both, frontend //and// backend.
"Personal data" Module
You may want to give your frontend members the option to subscribe themself for email noification with the Personal data module. This will work right out of the box when you are using the template member_default.
However when using the template member_grouped' you won't see the Forum/Helpdesk settings with the TYPOlight releases before 2.5.0. There is a workaround to use the grouped member display right now, which requires a small hack:
Edit the file /system/modules/frontend/ModulePersonalData.php and find this code:
// HOOK: add newsletter fields
		if (in_array('newsletter', $this->Config->getActiveModules()))
		{
			$this->Template->newsletter = $arrFields['newsletter'];
			$this->Template->newsletterDetails = $GLOBALS['TL_LANG']['tl_member']['newsletterDetails'];
		}
Now add the following code immediately below:
// HOOK: add helpdesk fields
		if (in_array('helpdesk', $this->Config->getActiveModules()))
		{
			$this->Template->helpdesk = $arrFields['helpdesk'];
			$this->Template->helpdeskDetails = $GLOBALS['TL_LANG']['tl_member']['helpdeskDetails'];
		}
Finally, go to the Personal data module and select the template member_grouped_helpdesk.
The layout may look somewhat messy by default, here is a suggestion to add to your CSS of the respective page:
.mod_personalData .checkbox_container span
{
    display:block;
    white-space:nowrap;
}

.mod_personalData .checkbox_container span *
{
    vertical-align:middle;
}
Enabling RSS Feeds
To enable RSS feeds you need to:
- Make settings in each category that you want feeds for
- Make global settings in the Contao settings
- Add a rewrite rule to your .htaccess file
- Optional: Add a link to the page header in case you want to display a feed icon in the browsers address field
Category Settings
In the category settings you need to enter the url of the page holding this category, plus check that RSS feeds are enabled. Repeat this for all categories where you want to have RSS feeds for:
Template:Extensions:helpdesk:hd100.jpg
Contao settings
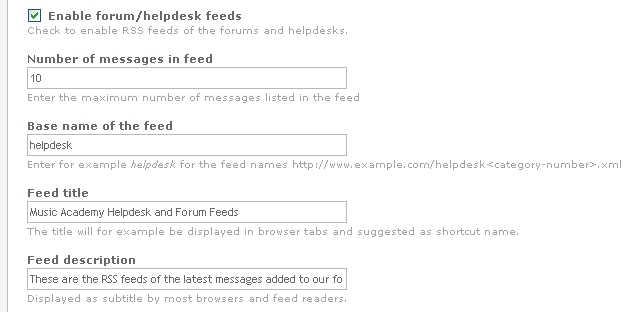
In the Contao settings enable the forum/helpdesk feeds, and then make settings for the maximum number of messages to display, the base name of the xml file (same as in the .htaccess below), the title and description of the feed. Please note that this title and description only comes into play for feeds of multiple categories, for single category feeds the title and description of the category is used:
.htaccess Modification
Add a rewrite rule such as below to your .htaccess file. Replace //helpdesk// by the term you defined as base name in the TYPOlight settings:
RewriteRule ^helpdesk([0-9,]+).xml$ system/modules/helpdesk/HelpdeskFeed.php?id=$1 [L]
A typical complete .htaccess for TYPOlight 2.6.0 might be:
- Enable mod_rewrite
RewriteEngine On RewriteBase /
- Block any URI protocol in the query string
RewriteCond %{QUERY_STRING} (ftp|https?):|/etc/ [NC] RewriteRule .* - [F,L]
- Block any URI protocol in the request
RewriteCond %{REQUEST_URI} (ftp|https?):|/etc/ [NC] RewriteRule .* - [F,L]
- Rewrite TYPOlight URLs
RewriteCond %{REQUEST_FILENAME} !-f RewriteCond %{REQUEST_FILENAME} !-d RewriteRule .*\.html$ index.php [L]
- Dynamic RSS feeds for forum/helpdesk
RewriteRule ^helpdesk([0-9,]+).xml$ system/modules/helpdesk/HelpdeskFeed.php?id=$1 [L]
Add RSS icon link to page layout
This is optional but very convenient for your users. In case you not yet have a distinct page layout for the forum/helpdesk, make a copy of the default page layout. Edit the layout and enter the following link to the //Additional head tags// input:
<link rel="alternate" type="application/rss+xml" title="RSS" href="http://www.example.com/helpdesk0.xml" />
Replace %%www.example.com%% by your site's url. The 0 tells to provide a feed over all categories the user has read access to. If you want to make a feed over the categories 4, 5 and 7 instead, the link would be helpdesk4,5,7.xml
Email Import and Notification
Email Settings
To send out notifications and import email a batch program must run on a regular base. You need to install the cron utility for this purpose. Below you find suggested settings for the two Forum/Helpdesk jobs. Use a time schedule that matches your needs; the samples below will execute once every minute.
Template:Extensions:helpdesk:hd024.jpg Template:Extensions:helpdesk:hd025.jpg Template:Extensions:helpdesk:hd026.jpg
Troubleshooting E-Mail Issues
- Check if your servers are properly configured to send out mails by creating a test-newsletter and sending it to one of your mail accounts. Send it to another server than the one used for sending out the mail to make sure the mail is not getting caught in some spamfilters or lost in any black hole.
- Using PHP Mail may work on well configured servers (which is not selve-evident these days, cheepo hosters are greeting). Use SMTP in case, that will work 100%.
- A common mistake is to use a different domain in the notification sender address than in the mail account in the system settings. For example when your SMTP account in the system settings is admin@example.com, a notification sender address such as forum@banana.net is likely to fail because that would be "relaying" which is forbidden in well configured mail servers. Of cause there are exceptions from this rule, for example when the mail server is configured to handle both of those domains. Leave the notification sender address empty until notification works in case.
- Switch the helpdesk logging to "debug" in the Contao system settings. You will find the log files at /system/logs/Helpdesk*.log. In case no log file gets created during the batch run, your directory permissions of /system/logs does not allow write access for the web server. In that case you can manually create the two files /system/logs/HelpdeskImport.log and /system/logs/HelpdeskNotify.log and give them read/write permissions for the web server (for example as chmod of 666).
- For debugging it is time-consuming to always have to wait for the scheduler to run. You can disable the scheduler jobs and manually trigger the batch by calling these url's (replace %%www.example.com%% by your own url of cause):
%%http://www.example.com/system/modules/helpdesk/HelpdeskNotifyExec.php%%
%%http://www.example.com/system/modules/helpdesk/HelpdeskImportExec.php%%
You will most likely just see a blank page when executing, but then check the log files after execution to see the results.
Manual upgrade from a previous version
| |
Caution: It is recommended to make backups of your files and your database before starting any upgrade. |
You can upgrade directly from any previous release, it is not necessary to install every version that was released between your old and new version of the application.
It is optional to delete the files of the old version before installing a new release; you can choose to just overwrite the old files. However there might be obsolete files which will stay in your installation that way. So for a clean update I recommend to manually delete these files and folders in advance:
- system/drivers/DC_HelpdeskTable.php
- system/modules/helpdesk
Next the procedure is basicly the same as with a new installation from scratch:
- Download the install package.
- Unzip/upload to your TYPOlight base directory on your webserver.
- Point your browser to http://www.yourdomain.com/typolight/install.php
- Enter the installation password and click Login
- Scroll down to Update database tables
- If any drops of obsolete table columns are due, they are by default unchecked. It is safe to check them now in order to have clean database.
- Click on Update database to have the necessary database updates applied.
| |
Note: | After upgrading, you should read the change log to see what has changed and might need your attention. |
Optimizing full text search
Full text search of mysql will by default not find any words shorter than 4 characters, or in the stopword list.
To improve search I recommend to lower the minimum word length to 2, or even down to 1. In case your site is not english only, you might also want to disable the default stopword list (or apply [customized one in your language]).
- Brief procedure:**
 * Edit the mysql configuration file
 * Restart the mysql server
 * Drop the fulltext indexes
 * Recreate the fulltext indexes
- More detailed description (debian example):**
Edit /etc/mysql/my.cnf\\ Within the section **[mysqld]** edit or add the following lines:
   #
   # Fulltext config
   #
   ft_min_word_len = 2
   ft_stopword_file = ""
Restart mysql:
/etc/init.d/mysql restart
Check system vars in phpMyAdmin to make sure it worked:
Extensions:helpdesk:myvars1.png Extensions:helpdesk:myvars2.png
Drop the fulltext indexes from the tables tl_search, tl_helpdesk_tickets and tl_helpdesk_messages. Check also the tables of other installed extensions for fulltext indexes, and drop them as well:
Extensions:helpdesk:dropft3.png
Extensions:helpdesk:dropft1.png
Extensions:helpdesk:dropft2.png
Use the TYPOlight installation or extension manager to recreate the indexes based on the new settings:
Extensions:helpdesk:makeft.png
Getting started
Well this section is currently very brief. Only a few screenschots so far, but I guess you will figure out usage yourself with some TYPOlight experience.
Create a new category =
Template:Extensions:helpdesk:hd111.png
Template:Extensions:helpdesk:hd110.png
Template:Extensions:helpdesk:hd113.png Template:Extensions:helpdesk:hd114.png Template:Extensions:helpdesk:hd115.png Template:Extensions:helpdesk:hd116.png Template:Extensions:helpdesk:hd117.png
Create a title module for the frontend
Basicly a title module is not required, however it helps you structure your forums and helpdesks when you want to group the categories into blocks.
Template:Extensions:helpdesk:hd118.png Template:Extensions:helpdesk:hd119.png
Template:Extensions:helpdesk:hd120.png Template:Extensions:helpdesk:hd121.png
Create block modules for the frontend
A forum/helpdesk block module displays a selection of categories in a block on the frontend. So the minimum to get started on frontend is one module of this type. In case you want to structure your categories you will make several of these modules:


