Contao.Dev ExtensionsBoxen
From Contao Community Documentation
| |
Incomplete Article: This article is not finished yet and needs expansion.
Please expand it and remove this notice when it is finished. |
Contents
Content-Box Module Description
Just copied the old description, text has to be rewritten for the new Extension repository.
With this module you can create content-articles and connect them to one or more pages. In Contao you normally have the page structure and you create articles which belong to a specific page.
With this module your can do it the other way round. First create an article and then choose on which pages it should appear. You can use this module to make page-specific content in the left or right columns which should appear on every or some pages. Examples are your contact-address, newsletter-subscription and so on.
This module makes it possible to reuse the same content on one or more pages. If you change this content-element the changes will appear on every page to which the box is connected.
Difference between the Content-Box-Module and the Alias?
In contradiction to the Alias-Module you don't have to create an article in the page-structure first. The contents of the box-module are completely independent of the page-structure an do not appear in the page-structure in the backend.
Features
- Use same content on one or more pages without using the Alias-Module.
- Choose from the PageTree on which pages the box should appear
- Create several Box-Modules - each module can be linked to a different page-section (e.g. left, right, main)
- Email-Encryption: Email-Addresses in the content of the boxes will be encrypted automatically
- Define the order of the boxes
- Add images to the content like you can do it in the news or articles
- Changing style and appearance of each box or each box-section by defining individual style/css-ids
Installation
Download ZIP-File and unzip it. Copy the "boxes"-Directory in to the 'system/modules' directory of your Contao installation so that you have an directory: "/system/modules/boxes/". After this, run the Contao installer tool to update your database. Box-Module is now installed.
1. Preparation
- Since version 1.1 the module has got some more features and there has been some major modifications, so you will find more options and maybe the names of the fields has changed. But the way to install the tool and the main-functions are already existent. So do not wonder if you see something different, maybe we can update the screenshots and instructions sometimes.
It is possible to have one or more box-sections. This means, you can manage for example one box-section (with several boxes inside) on the left-column and another box-section on the right-column. Follow these instructions to learn how it works.
1.1 Create Modules
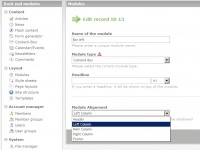
First create a new module and choose "Content-Box" as Module-Type.
Please use the field Module Alignment to define on which column the module should appear. As you can see, the module is named "Box left". Therefore choose the Left Column for this example.
After you created this module, please create another module and give it the name "Box main" and choose the Main Column in the field Module Alignment
Now you have created two Modules:
- 1. Box left
- 2. Box main
1.2 Connect the Modules to the page layout
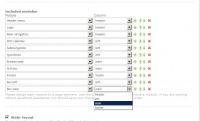
Now go to "page layouts" and choose the layout you use for your website. Scroll down to the section Included Modules and add at the end the two Modules you have just created in the first step.
Please be careful that you choose the same column which you chose for the module in step 1. This means: Module "Box left" should be connected to column left and Module "Box main" should be connected to the main column.
- This sounds a little bit complicated in some way. But if you are more familiar with this module you will see that you have complete flexibility to change the section on which your boxes should appear. for example: instead of name the box-module "Box left" you can name it "Box Contact". Then you can freely and quickly choose where the box should appear. Perhaps after a website rework you want to have the contact-boxes on the left side you dont have to edit each box separately - you just have to change the assigned column in this page-layout options.
Save your changes.
2. Create and Edit the Box-Content
Now you can create the box-content-elements. Click on the Content-Box Module and then "create new box".
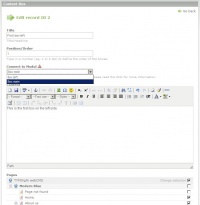
You can see now the following screen:
Title
This is the title of the box.
Position/Order
This is for sorting the boxes. Type in a number. The ordering is ascending.
ORDER BY position ASC.
Connect to Module
As you know we have just created two Modules and linked them each to a specific column. Here you can now choose on which Box-Module (which means in which column) the box should appear.
Content
This is for the content.
You can use InsertTags or/and HTML.
Pages
Here you can select one or more pages from the pagetree in which the box should appear. This is the main-feature of this module. Instead of using an Alias which you must insert on each page manually, you are able to select the pages on which the content should appear in a simple way by selecting the pages in the page-tree. for example: if you have some pages with downloads, you can make a box with general information and a link to a pdf-reader-software. You can now choose these pages which includes the downloads and the download-infobox will appear on all these pages.
Now click "save and close"
To understand how the module works, please create two other boxes.
For the 2. Box type in the following:
- Title: "Second Box left"
- Position: "2"
- Connect to Module: "Box left"
- Pages: choose one or more pages
Create a 3. box:
- Title: "First Box main"
- Position: "1"
- Connect to Module: "Box main"
- Pages: choose one or more pages
Now you can see the following screen:
The boxes are sorted by the connected Module and then by its position.
3. The Result
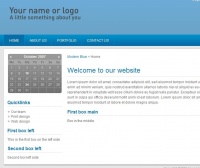
As you can see there are now the two boxes in the left column and one box in the main column. If you want you can now create another box-module called "box-footer" for example, connect it to the footer-section in the page-layout and use it for contact-information or copyright-information. You can also use this module to display text or images in the header of your page and so on.
Please feel free to add more information or inform me about mistakes in phrasing.


