Difference between revisions of "First page"
From Contao Community Documentation
(→What we have allready) |
(→Requirements) |
||
| (17 intermediate revisions by one user not shown) | |||
| Line 1: | Line 1: | ||
| − | {{ | + | {{Note|'''TRANSLATION''' - My mother-thongue is German. If you are a native english speaker, please '''feel free''' to '''eliminate typos and stylistic errors'''. Thanks in advance, Contao-Fan }} |
[[de:Die erste Webseite]] | [[de:Die erste Webseite]] | ||
[[Category:First_steps]] | [[Category:First_steps]] | ||
| Line 18: | Line 18: | ||
*[http://www.contao.org/installation.html Installation] needs to be checked with the [http://www.contao.org/configuring-the-live-server.html#system-check-tool system-check] tool and removed from all errors if there are some. | *[http://www.contao.org/installation.html Installation] needs to be checked with the [http://www.contao.org/configuring-the-live-server.html#system-check-tool system-check] tool and removed from all errors if there are some. | ||
*The Example Webpage "Musicacademy" will NOT be imported while installing Contao | *The Example Webpage "Musicacademy" will NOT be imported while installing Contao | ||
| − | * | + | *Knowledge of HTML and CSS |
=Preparations= | =Preparations= | ||
| Line 113: | Line 113: | ||
[[File:firstsite-layoutcolor_en.png|Colorize the Layout|frame|center]] | [[File:firstsite-layoutcolor_en.png|Colorize the Layout|frame|center]] | ||
[[File:firstsite-frontendlayout_en.png|Frontend-Layout|frame|center]] | [[File:firstsite-frontendlayout_en.png|Frontend-Layout|frame|center]] | ||
| + | |||
| + | The following defaults are now wizible after colorizing the "sections" in the layout.css: | ||
| + | |||
| + | *The overall (fixed) with of the page | ||
| + | *Hight of the header | ||
| + | *Left column with (with of the ''' "main-section" ''' is '''overall-with minus left column with''') | ||
| + | |||
| + | =Module Part 2= | ||
| + | Next we create the Navigation Module. For this we are changing to the "Modul-Manager" ('''Themes''' "firstsite" --> '''Frontend-Module''' and do a new Modul. The [[ModulNavigation|Settings]] are the following: | ||
| + | |||
| + | [[File:firstsite-navi_en.png|Navigation-Mmodul|frame|center]] | ||
| + | |||
| + | After creating the Navi-Module we just have to select the right column where it has to be displayed. Done will this be in the '''Theme-Manager''' in the section '''Layout''' in the Back-End module. In the Section Page Layout we edit the "default"-Layout. Just add a new section (by duplicating the Article-Module on the Plus sighn). We just need to select the nav-modul and select the column: | ||
| + | |||
| + | [[File:firstsite-module-2_en.png|Insert Layout Navi-module|frame|center]] | ||
| + | |||
| + | =Article= | ||
| + | Last but not least we need to feed the pages with articles now. When you create a page, Contao automatically generates a article with the same Name. | ||
| + | |||
| + | [[File:firstsite-articlemanager_en.png|Artikel Manager|frame|center]] | ||
| + | |||
| + | After we have to create a '''Text-Element''' and save it in the Article. Just do this for every page with the specific Content. | ||
| + | |||
| + | [[File:firstsite-article_en.png|Article|frame|center]] | ||
| + | |||
| + | =The Webpage= | ||
| + | The Example Website is now made with the basic steps. Check it now in the Front-End. You should see the following: | ||
| + | |||
| + | [[File:firstsite-frontend_en.png|Front-End View of a Basic Website|frame|center]] | ||
| + | |||
| + | Now you should be alble to make the basic steps of a Webpage. Several steps just repeat and other stepst have to be done to make a compleate Webpage. Pictures are missing and a bit brush up with CSS would aslo be nice. | ||
| + | |||
| + | If you like more information or to see what is possible with CSS, a good idea would be to download a free Theme and analyze CSS Commands the Theme has been formated with. Good Links for free themes you find in the german community [http://www.contao-community.de/showthread.php?13346-%DCbersicht-aller-verf%FCgbaren-kostenlosen-Contao-Themes-amp-Templates free Themes]. | ||
| + | |||
| + | |||
| + | ---- | ||
| + | |||
| + | Translation by [[User:ciaobello|ciao_bello]] - 19.02.2011 | ||
Latest revision as of 10:54, 21 July 2012
| |
Note: | TRANSLATION - My mother-thongue is German. If you are a native english speaker, please feel free to eliminate typos and stylistic errors. Thanks in advance, Contao-Fan |
| Applies to | |
|---|---|
| Contao version | for 2.9 |
Contents
Introduction
This tutorial should help you to do the first step creating a website with Contao and show you on a very basic level how to begin. It helps you get answers of the questions ... where to I begin with my Webpage? What are the first steps.
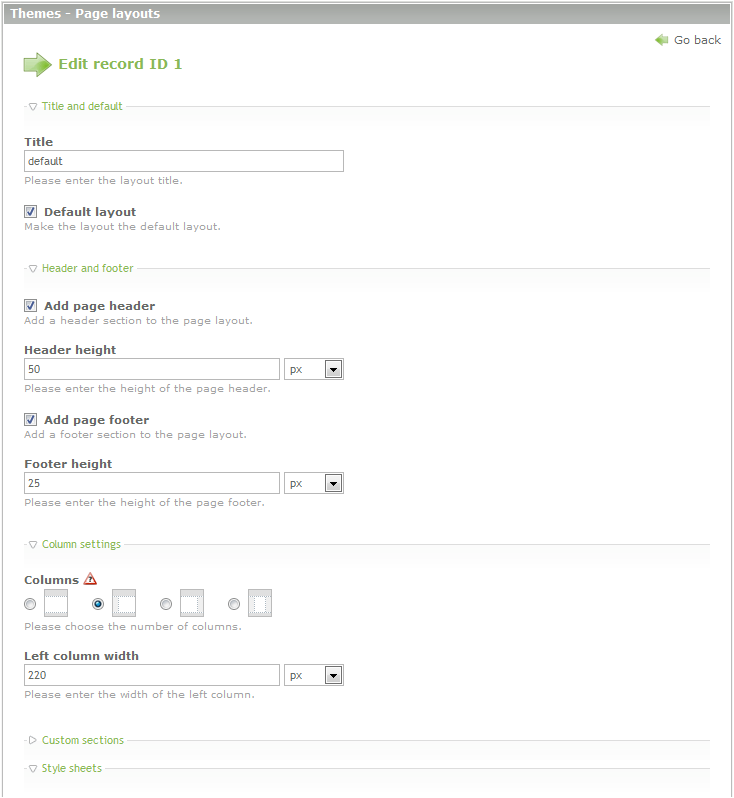
The result of the tutorial will be a web page with two columns, a header and a footer with some pages and articles. The requirements are:
- Overall with: 960px
- Alignment: center
- High of header: 50px
- With of left column: 220px
- High of footer: 25px
Requirements
- Contao needs to be installed with success
- Installation needs to be checked with the system-check tool and removed from all errors if there are some.
- The Example Webpage "Musicacademy" will NOT be imported while installing Contao
- Knowledge of HTML and CSS
Preparations
Files
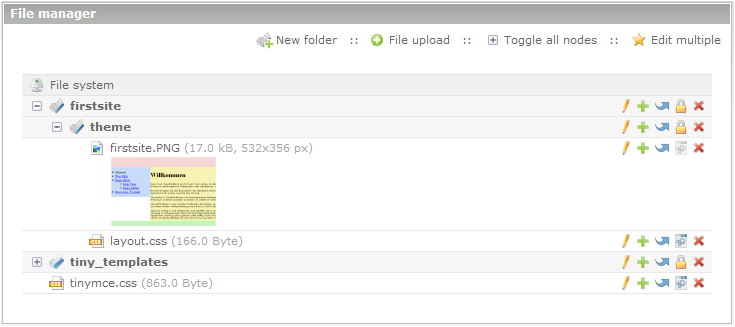
All files(pictures, documents, Video- Audio-files ...) where belong to the web-project, are stored in the /tl_files/ folder. To get a good overview, you can store the files in several sub-folders. With the integrated [File_Manager] (Backend-System --> File manager), you can create the structure as needet. For example we put all the files for the Webcontent in a subfolder named "firstsite/theme". As this here is a very simple project we could create the CSS File in the Subfolder "theme". We name it layout.css (more later). The full path will be tl_files/fistsite/theme/.
Templates
Templates (check also edit_templates) are stored in the folder /templates/. In the Back-end you can find the templates in Layout --> Templates. Similar as with the files, you can create a sub-folder named "project-name". In our case it is /templates/firstpage/.
Theme
We do create in the Theme_Manager a new "theme" with the name "fistsite". With this, we do have the controll over all actions where are needed to display a wep-project. This are files, stylesheets, frontend-modules and page-layouts.
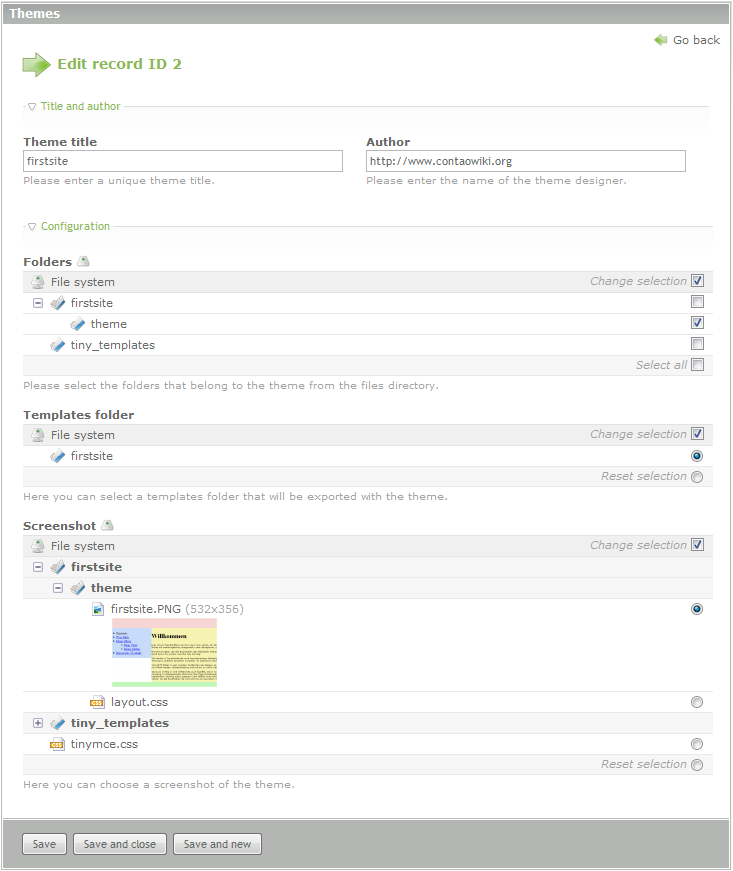
When you create a "theme" you have to give a name and also mention the autor. Below you make settings to wich folders the "theme" belongs. Also the template folder can be selected. If you have already a screen-shot of your web-project you will be able to select it to show a small picture.
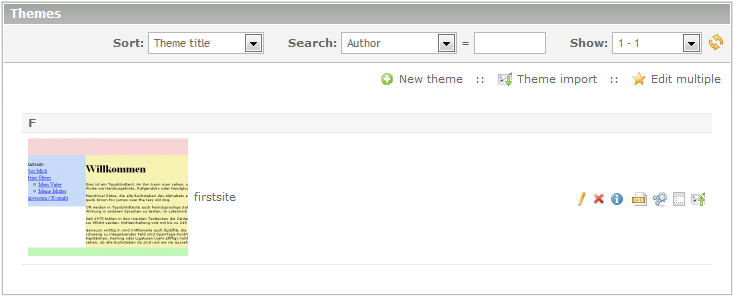
If you save your "theme" you will see a overview of it with several functions you can access. From left to right, the small Icons represent the functions as, edit themes; delete themes; information; CSS edit of the theme; front-end Modules; page layouts; and export of the theme. (For the screen-shot below i used contao 2.9.3)
Stylesheets
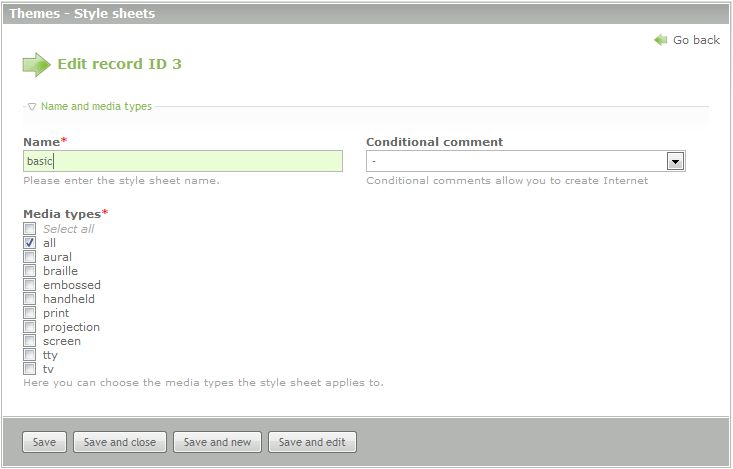
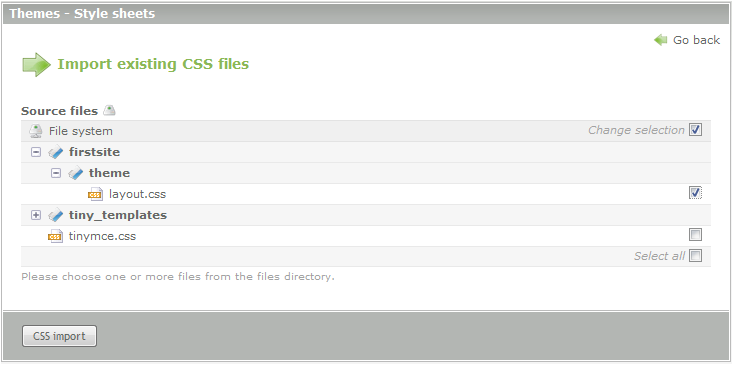
You can create a Stylesheet for your own theme. On the theme-manager by the theme "fistsite" you have the CSS button. Within this button click you will open a overview where you see all your style-sheets for the theme you selected. With "new style-sheet" you create the necessary file.
It is also possible to import a CSS file. You just have to put it in the tl_files. As I mentioned while explaining the "File Manager" under the section "Files" when you put your CSS files in this Folder, you will also get it while you do a export of your theme.
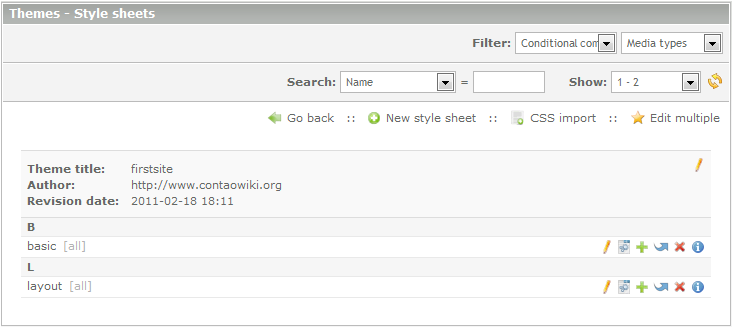
The CSS-Manager looks like this after creation and import of the CSS Files:
Page Layout
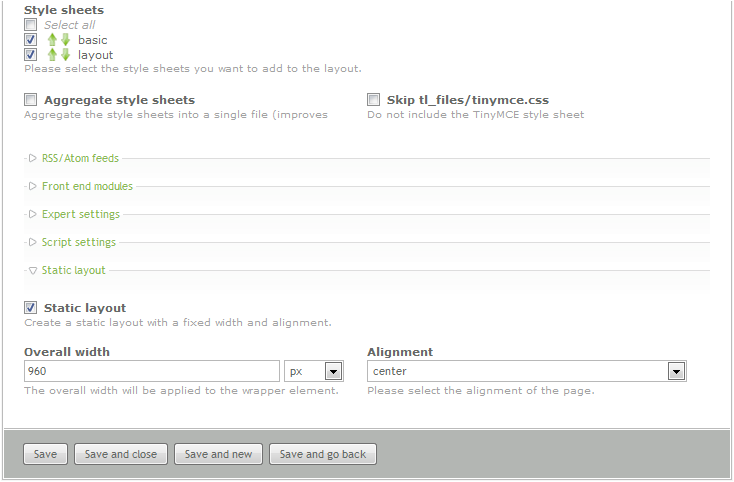
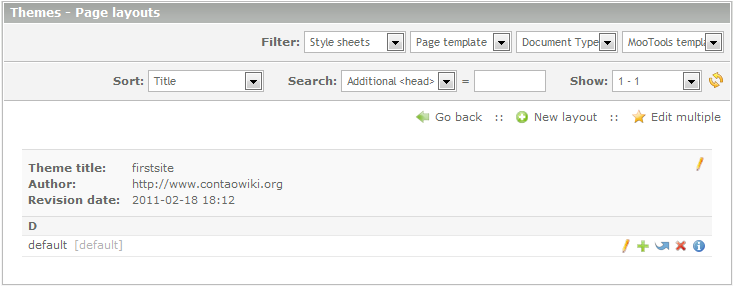
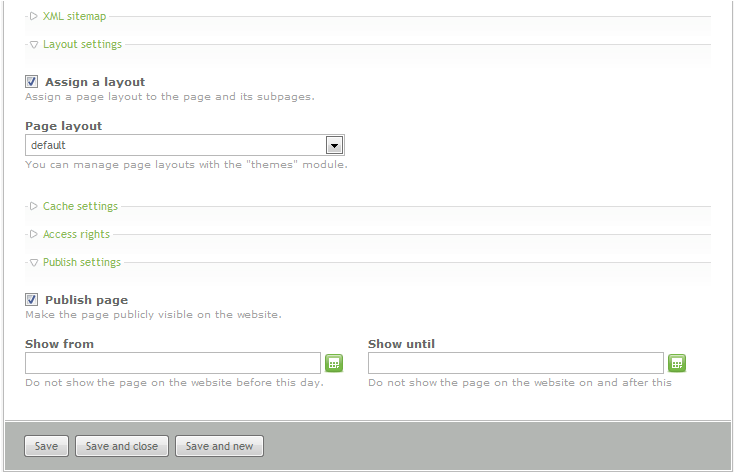
On the next step we will create a Pagelayouts. Back in the theme-manager on the theme "fistsite" we have to click on the "page-layout" button (second last one on the right). Now it is up to create a new Layout and we name it default. As mentioned in the Introduction we do the following configuration:
The Layout Manager looks like this now:
Modules Part 1
The theme just needs the modules. For our example page we do just need one module. It is a Navigation Module. But because we not have a site-structure yet, we will finish this part in the section (see Modules Part 2). The module "article" makes an exeption. It not has to be created by yourself. The system does this Module automaticly. You just have to thell the system where you want to display the Articles. In the section "Frontend-Module" you can select where to display it. We need it for the example-page in the "main column".
Site structure
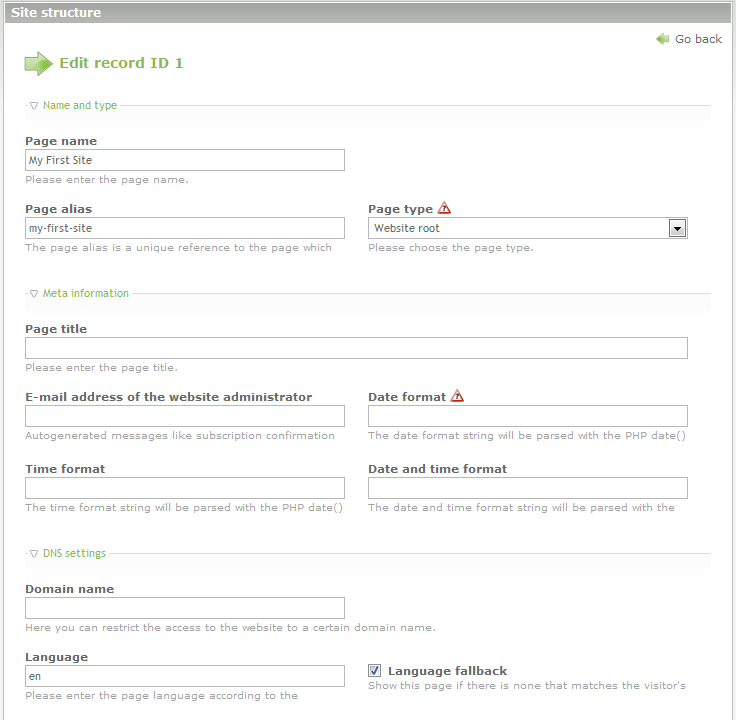
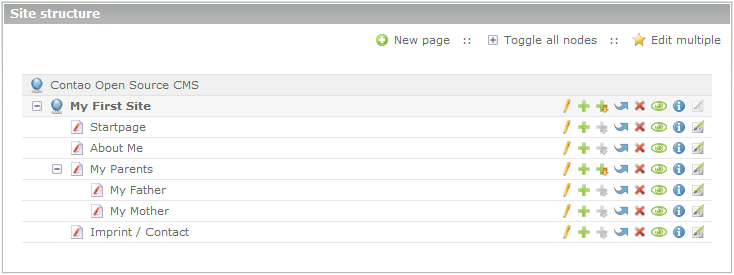
The Site structure you can find in the "Back-end" under the section "Layout" . The Site-structure makes the hierarchy of the "Articles" in the Website. Contao has a "Multi-domain" functionality. So, first you have to create the Start-point of the website. The Page-type you select here is the Website-root.
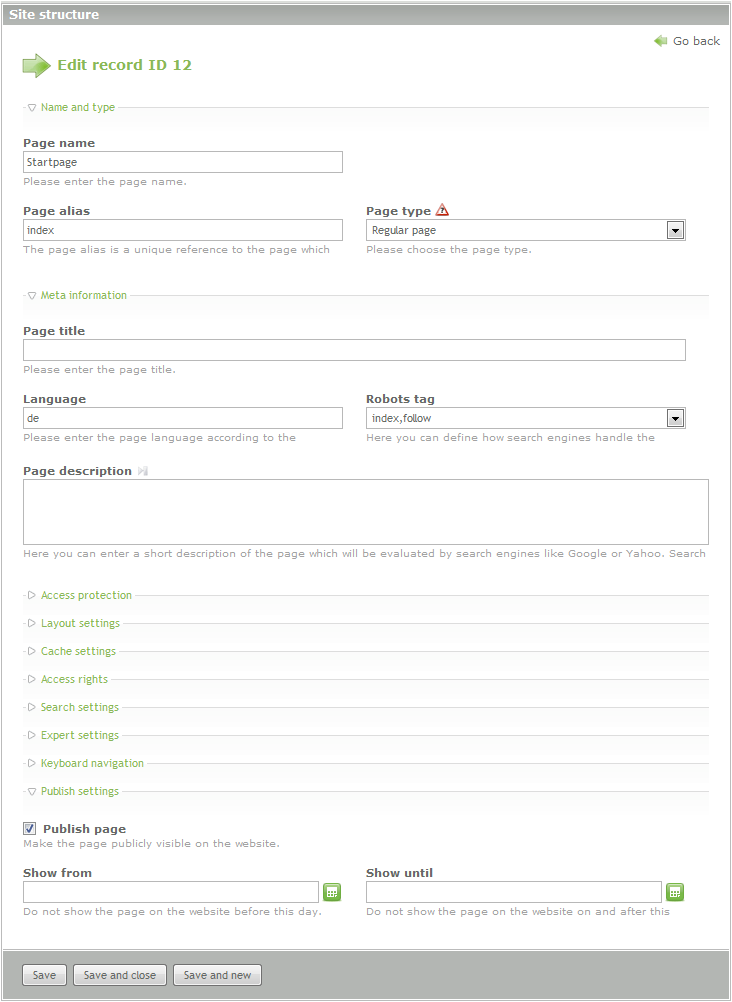
Next we just use the "Regular-page" type within the Website root. The rest of the settings you can get from the Screen-shot below:
| |
Hint: | The Page Name is used in the FE to name the Menu.
Page Alias is not really needed to fill up, then Contao is creating a unic one on it self when you let this field blank. For the Startsite/Home it makes sens to use the "Page-alias" index. Then you will get the URL as mydomain/index.html when you use Rewrite URL's The advantage is, that when you let fields free, Contao will use it's own taxonomy. As example the Page Name "My First Site" will be made with small letters and for the blank it will be used a dash ( my-first-site ). The URL will look much more standardized in the end. |
The example-site contains 4 Mainnavigations:
- Startpage
- About Me
- My Parents
- Imprint/Contact
The Mainnavigation "My parents" contains a subnavigation named:
- My Father
- My Mother
The Site Structure looks like this:
What we have allready
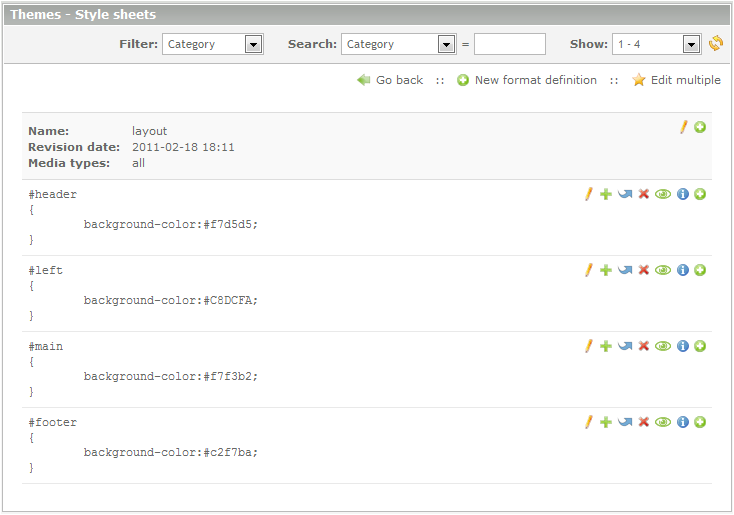
Till know we made a "theme" including "page-layout" and "style-sheet" and the necessary "page-structure". When you looked in the "front-end" you just got a "page not found" message. Since we made the changes above, we just see a blank page. As we not created any Articles yet this seems to be ok so. But if you look the "source-code" you can see some sections. Now it is time to colorize the different sections of our website to see where they are in the page. We do this in the layout.css. We go back to the "theme" in the back-end "layout" section. On the CSS section we do open the file and add the following:
The following defaults are now wizible after colorizing the "sections" in the layout.css:
- The overall (fixed) with of the page
- Hight of the header
- Left column with (with of the "main-section" is overall-with minus left column with)
Module Part 2
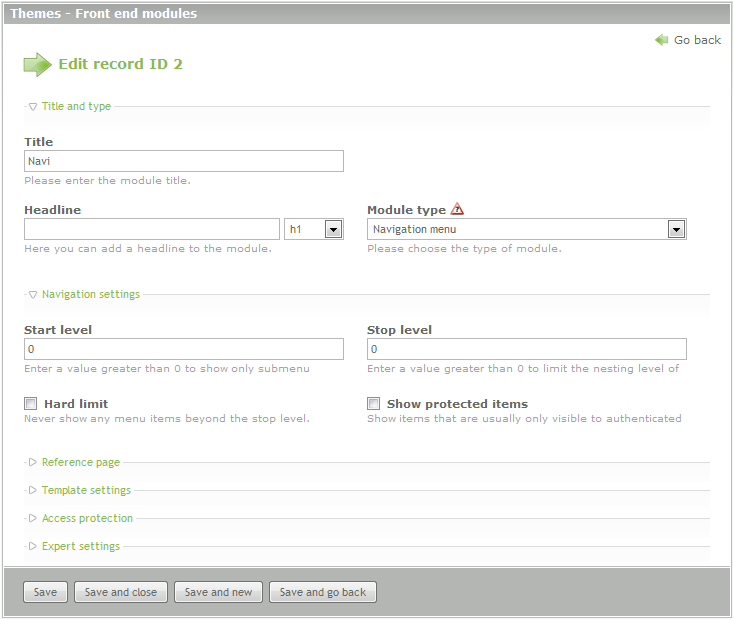
Next we create the Navigation Module. For this we are changing to the "Modul-Manager" (Themes "firstsite" --> Frontend-Module and do a new Modul. The Settings are the following:
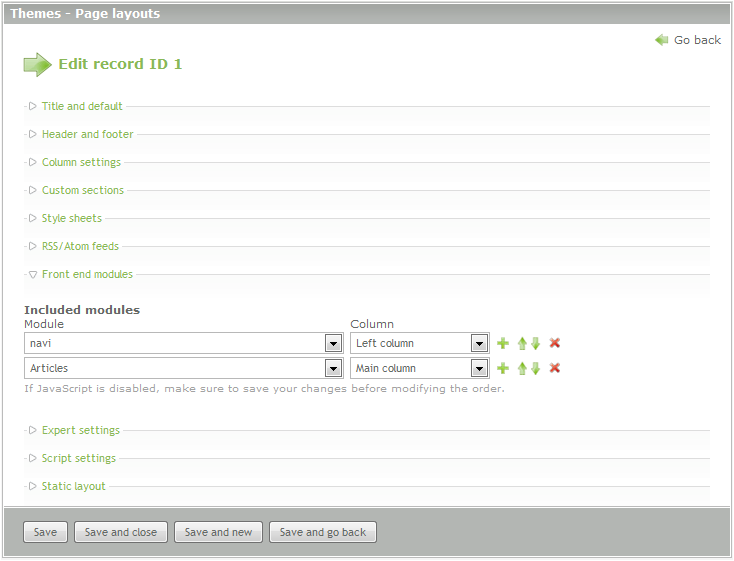
After creating the Navi-Module we just have to select the right column where it has to be displayed. Done will this be in the Theme-Manager in the section Layout in the Back-End module. In the Section Page Layout we edit the "default"-Layout. Just add a new section (by duplicating the Article-Module on the Plus sighn). We just need to select the nav-modul and select the column:
Article
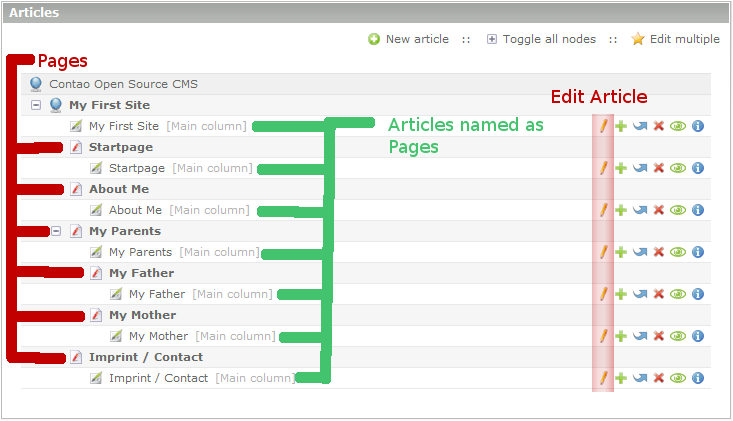
Last but not least we need to feed the pages with articles now. When you create a page, Contao automatically generates a article with the same Name.
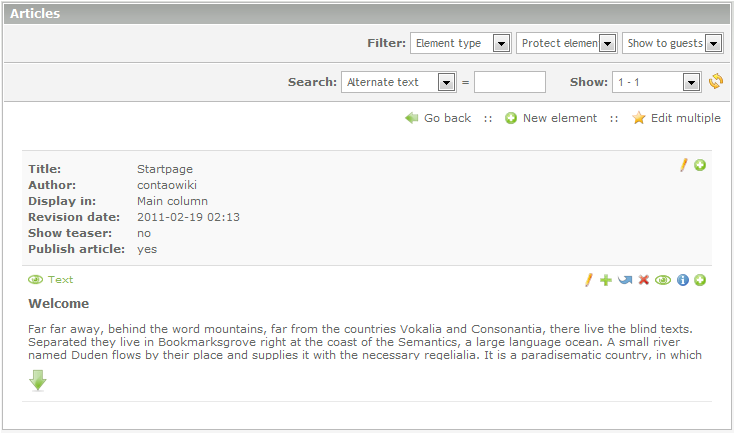
After we have to create a Text-Element and save it in the Article. Just do this for every page with the specific Content.
The Webpage
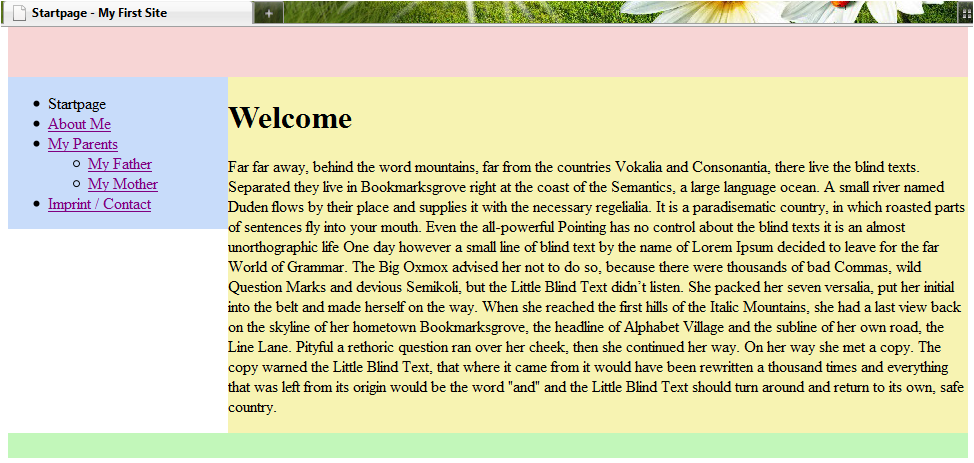
The Example Website is now made with the basic steps. Check it now in the Front-End. You should see the following:
Now you should be alble to make the basic steps of a Webpage. Several steps just repeat and other stepst have to be done to make a compleate Webpage. Pictures are missing and a bit brush up with CSS would aslo be nice.
If you like more information or to see what is possible with CSS, a good idea would be to download a free Theme and analyze CSS Commands the Theme has been formated with. Good Links for free themes you find in the german community free Themes.
Translation by ciao_bello - 19.02.2011
