Contao.Dev ExtensionsFormauto
From Contao Community Documentation
| |
Incomplete Article: This article is not finished yet and needs expansion.
Please expand it and remove this notice when it is finished. |
Contents
- 1 Form Auto Module
- 1.1 Installation
- 1.2 Create Form Thank You Page
- 1.3 Create Automatic Form
- 1.4 Create Form Fields
- 1.5 Add Form Validation (optional)
- 1.6 Add Confirmation E-mail (optional)
- 1.7 Form Auto Info Modules
- 1.8 Form Auto Free Module
- 1.9 Form Auto Listing (use instead of Listing)
- 1.10 Form Data: View/Edit/Export
Form Auto Module
The Form Auto Module adds a new form type called Automatic Form, which allows you to store the form values into an auto-managed table (as you modify form name and form fields), adds filter, unique and count/total validation and also adds a confirmation e-mail using HTML template with tags.
The package consists of 3 parts:
- Module -- auto-store into a table, validation and back-end view, edit, delete
- DataContainer -- to wrap the form database table into a data container
- Support Files -- 2 example confirmation e-mails using both methods for tags
Installation
- Download and Install from Extension Repository
Create Form Thank You Page
- First, create a Page for Thank You
- Create a Form Auto Info Module (there are no "parameters" to set)
- Place the module above into your above Thank You page (example, use an article and add the module as a Content Element). This will display the submitted values after the registration has been completed.
Create Automatic Form
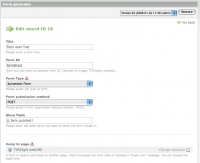
Use the Form Generator and create a Registration Form using the form generator
- Change the Form Type to [Automatic Form]
- Enter the Store Table value -- the tablename to be auto-managed in the database, e.g. form_myform1
- [x] Jump to page -- select the "THANK YOU" page above, where you placed the Form Auto Results Module -- to display the posted form data correctly to the user as confirmation.
- Click Save and Edit
Create Form Fields
While adding fields, the database table will be automatically managed. Warnings will be presented if you try to create certain system columns as field names.
- Add form fields like: firstname, lastname, email, venue, session1, session2, guests, etc.
- If you want to use a venue to filter your results, use a radio/select fields (no multiples)
- If you want to ensure unique entries, ensure you have a field like e-mail, which will be unique.
- If you want to make breakout sessions, use a radio/select/checkbox fields
Add Form Validation (optional)
Go back and edit the form again. Now go down to the 3 validation types and add them using the guide below.
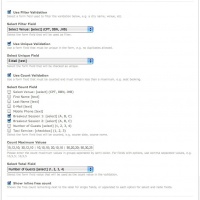
- [x] Use Filtered Validation
Select a Filter field from the drop-down that will be used as a filter for validation, e.g. venue or city. - [x] Use Unique Validation
Select a Unique field from the drop-down that must be unique (no duplicates), e.g. email - [x] Use Count Validation
Select one or more Count fields from the checkbox list to add counter fields. Use the radio/select/checkbox if you want them to book multiple choice or several sessions or breakout sessions.
- Count Maximum Values:
Enter the count maximum values using the guide below:- Separate each Filter option by (|)
- Separate each Count Field by (;)
- Separate each Count Option by (,)
Using the Image below as an Example:
Filter:
- Venue [select] (CPT, DBN, JHB) -- option values in brackets
Count Fields:
- Breakout 1 [select] (A, B, C) -- option values in brackets
- Breakout 2 [select] (A, B, C)
Now you can enter Count Maximum Values like this:
[* 15,12,10; 30,12,10 | 10,10,10; 20,10,10 | 50,20,20; 50,30,25 *]
or in words --
- Venue: CPT | Breakout1: A=15,B=12,C=10 ; Breakout 2: A=30,B=12,C=10
- Venue: DBN | Breakout1: A=10,B=10,C=10 ; Breakout 2: A=20,B=10,C=10
- Venue: JHB | Breakout1: A=50,B=20,C=20 ; Breakout 2: A=50,B=30,C=25
- Select Total Field
Select a field from the drop-down to use as a value to count with, instead of just 1. Use this to allow the user to choose how many guests they will bring to the session (e.g. 1: just me, 2: me + partner, 3: family of 3, 4: family of 4, etc.). Here you can ONLY choose a SELECT/RADIO drop-down, as you don't want the user to type this in (to restrict his maximum). - Show inline free countbr />Select to show the free count appended to the label (text field label, or option label in select, checkbox or radio fields)
Add Confirmation E-mail (optional)
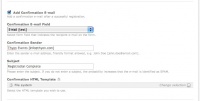
- select the Confirmation E-mail field to use as the e-mail of the person registering, so the confirmation e-mail will know where to send.
- Add Confirmation Sender using friendly format: Name [name@domain.com]
- Add Subject of the e-mail
- [*] Confirmation HTML Template -- select file used as HTML template -- you can add tags like {{form::firstname}} or to save some effort, you can include 1 tag called {{formauto::all}} which will create a table and add all the fields to the e-mail (useful if you want to set-up 1 standard confirmation e-mail per site)
Form Auto Info Modules
This support module has no real parameters and it is used on a Thank You page to display the processed form data in readable format to the end-user, as confirmation of their form submission (as used above).
Form Auto Free Module
This support module asks for the FORM and will show a table with all the free seats available.
Form Auto Listing (use instead of Listing)
This support module asks for the FORM, instead of the tablename. The module works just like the listing module, but with CSV formatted export -- if you use the list_formauto.tpl template.
Form Data: View/Edit/Export
When you list the forms in form generator, you will see a new icon (form/users icon) next to the edit buttons. This button will allow you to view the form table data. Once you have some submitted data, the data will appear in spreadsheet data format (almost) with no headings (it assumes you know the headings in the form).
- here you can now edit the data, if an event admin wants to change the booking for a person (mistaken booking, etc).
- here you can also delete the entry (again, for mistakes/admin)
- the IP and date is also recorded
- You can also export the raw data to a CSV file (at the top)


